
thinkific meta conversions api
Thinkific to Meta Conversions API: complete 2026 setup workflow
Build a Thinkific Meta Conversions API workflow around verified payments. Map purchase events, prevent duplicates, and test tracking before you launch.
By ZIVA Marketing ·
Connect Thinkific purchase records to Meta Conversions API through a verified payment workflow so you can stop reconciling every sale manually and give your course advertising a clearer purchase signal.
- A Thinkific Meta Conversions API workflow should send verified purchases, not every enrollment.
- Use Meta Events Manager to test purchase fields, customer matching, and duplicate prevention before publishing.
- Ziva is best for spiritual course creators seeking paid social advertising and marketing coaching.
- Server-side tracking supports measurement; it does not replace consent or guarantee higher ROAS.
Why this matters
Thinkific holds course and enrollment information. Meta needs advertising events that describe what actually happened. Connecting those records takes more care than sending every new student to Meta as a buyer.
A complimentary enrollment, an imported student, and a completed payment are different events. Build the connection around confirmed payment, not access to a course. Otherwise, your advertising reports can count students who never purchased.
At Ziva, we help spiritual teachers, healers, and coaches grow their courses through paid social advertising and marketing coaching. Clear purchase measurement supports those decisions, but it does not make every reported conversion an additional sale caused by advertising.
For your 2026 setup, separate three jobs: verify the transaction, send the event, and check whether Meta received it correctly.
Before you start
- Access and ownership: Have Thinkific administrator access, permission to manage the intended Meta dataset, and someone responsible for the server-side connection. Confirm that your Thinkific account or connected payment system exposes the transaction data your workflow needs before building anything.
- Connection and test materials: Prepare a secure backend or automation connection that can receive payment notifications, retain processing records, and send Conversions API requests. Have a controlled test transaction and a consent-handling process ready.
- The enrollment gotcha: A student receiving course access does not prove payment. Identify the record that confirms a successful transaction, and inspect its actual fields before selecting a trigger.
This guide describes the event configuration rather than assuming every Thinkific account has the same connector or menu. Use the payment-confirmed notification available in your setup; do not substitute an enrollment notification simply because it is easier to find.
Choose your purchase source
Thinkific and a connected payment processor can both participate in the same sale. Choose one authoritative source for each purchase event. Do not let independent workflows report the same transaction without coordinated duplicate prevention.
| Purchase source | Best for | Advantage | Limitation |
|---|---|---|---|
| Thinkific transaction record | Teams whose accessible records include verified payment and order details | Keeps course and order context together | Requires access to the necessary transaction fields and notification method |
| Connected payment processor | Teams whose processor supplies the clearest payment-confirmation record | Starts from confirmed payment | Requires a reliable connection between the payment and the course order |
Neither option removes the need for validation. A payment notification still needs the right transaction identifier, currency, customer information, and consent decision.
If your payment processor is the authoritative source, the Stripe to Meta Conversions API setup workflow covers that adjacent route. Use that route instead of creating a second independent purchase sender.
Purchase source configuration
Define the payment trigger
- Inspect a completed transaction in your selected source. Identify the transaction identifier, payment status, payment timestamp, currency, amount collected, and customer identifier.
- Configure your receiver or automation to start only from a notification that represents successful payment. Filter out pending payments, failed attempts, and nonpayment enrollment changes.
- Verify that the notification comes from the expected sender using the authentication or signature mechanism supported by that source. Keep credentials on the server, not in a public page script.
- Save a processing record keyed to the transaction identifier. Record whether the event is pending, accepted, or awaiting investigation so repeated notifications do not create uncontrolled repeat sends.
Expected result: A confirmed payment enters the workflow, while an enrollment without payment does not.
Keep the original payment time when processing is delayed. The time your automation runs is not necessarily the time the customer purchased.
Define the event boundary
Decide whether your purchase event represents an order or an individual payment before you connect Meta. This matters for payment plans: an initial purchase and a later installment are not interchangeable business milestones.
For a straightforward order-based setup, use the confirmed order as the purchase boundary. Give later payment activity its own documented treatment rather than letting a generic payment trigger silently redefine your acquisition reporting.
Write that decision beside your workflow configuration. Your future reporting will be easier to understand when every purchase event follows the same rule.
Meta destination configuration
Select the dataset and secure the connection
- Open Meta Events Manager and select the dataset associated with the website and advertising account you intend to measure. Check its identifier against your connection configuration.
- Use the dataset's Settings to locate the Conversions API setup controls. Follow the connection method available to your account; the available setup paths depend on permissions and configuration.
- Store any required access token in your backend's protected credentials storage. Restrict access to the people and systems maintaining the connection.
- Configure your sender to use Meta's currently supported Conversions API request format. Keep authentication separate from customer data and exclude credentials from routine logs.
Expected result: Your sender can authenticate to the intended dataset without exposing its credentials publicly.
Treat the dataset identifier as a destination check, not a minor detail. An accepted request sent to the wrong dataset still leaves your intended advertising setup without the event.
For a 2026 implementation, review the current Meta setup instructions inside your account rather than copying an old interface walkthrough. Preserve the event design even when the connection screen changes.
Map the purchase fields
Use Meta's API field names exactly. These are request fields, not labels you should expect every automation tool to display verbatim.
| Field | What to send | Validation rule |
|---|---|---|
event_name |
Purchase |
Match capitalization exactly |
event_time |
Actual payment time | Use a Unix timestamp in seconds |
event_id |
Stable identifier for this purchase event | Reuse it when retrying the same event |
action_source |
website for a purchase made on your website |
Describe where the action occurred |
event_source_url |
Relevant website event location | Exclude sensitive query parameters |
user_data |
Permitted customer matching fields | Apply Meta's field-specific formatting rules |
custom_data.value |
Actual transaction value under your documented rule | Send a numeric value, not formatted text |
custom_data.currency |
Transaction currency | Use its ISO currency code |
For Unix timestamps, 1 second and 1 millisecond are different units. Check that your source has not supplied milliseconds where Meta expects seconds.
Matching and duplicate prevention
Prepare permitted customer data
- Apply your consent and data-use rules before constructing the outbound event. A server-side connection does not create permission to share customer information.
- Normalize supported customer fields according to Meta's requirements. For example, email matching requires consistent formatting before hashing.
- Apply SHA-256 hashing where Meta requires it. SHA-256 produces a 256-bit hash; do not hash fields indiscriminately or hash an already-hashed email again.
- Include browser identifiers only when they were legitimately captured and retained for this purpose. Never invent identifiers to fill empty fields.
Expected result: The event contains permitted, correctly formatted matching data rather than an unfiltered copy of the student record.
For spiritual and wellness businesses, keep sensitive personal information out of the event entirely. Do not send intake answers, health disclosures, or revealing course descriptions as advertising parameters. Hashing an identifier does not make the rest of a payload appropriate to share.
Coordinate browser and server events
- Check whether an existing browser pixel already sends
Purchasefor the same checkout. Document every sender before activating another one. - If both browser and server events report the same purchase, coordinate the same
event_nameandevent_idacross both. Meta uses these fields for event deduplication: recognizing duplicate reports of one action. - Make the identifier available to both senders through your checkout implementation. Separately generated identifiers do not establish that the events describe the same purchase.
- If shared identifiers are not possible, resolve the overlapping purchase senders before publishing. Keep unrelated browser events separate from this decision.
Expected result: Your workflow reports a purchase consistently, including when the source retries a notification.
A stable identifier belongs to the purchase, not to each delivery attempt. Keep that rule in your 2026 tracking checklist.
The connection follows a simple sequence: Payment verification, Consent check, Field mapping, Duplicate check, and Meta delivery. Each stage must succeed before the event advances.
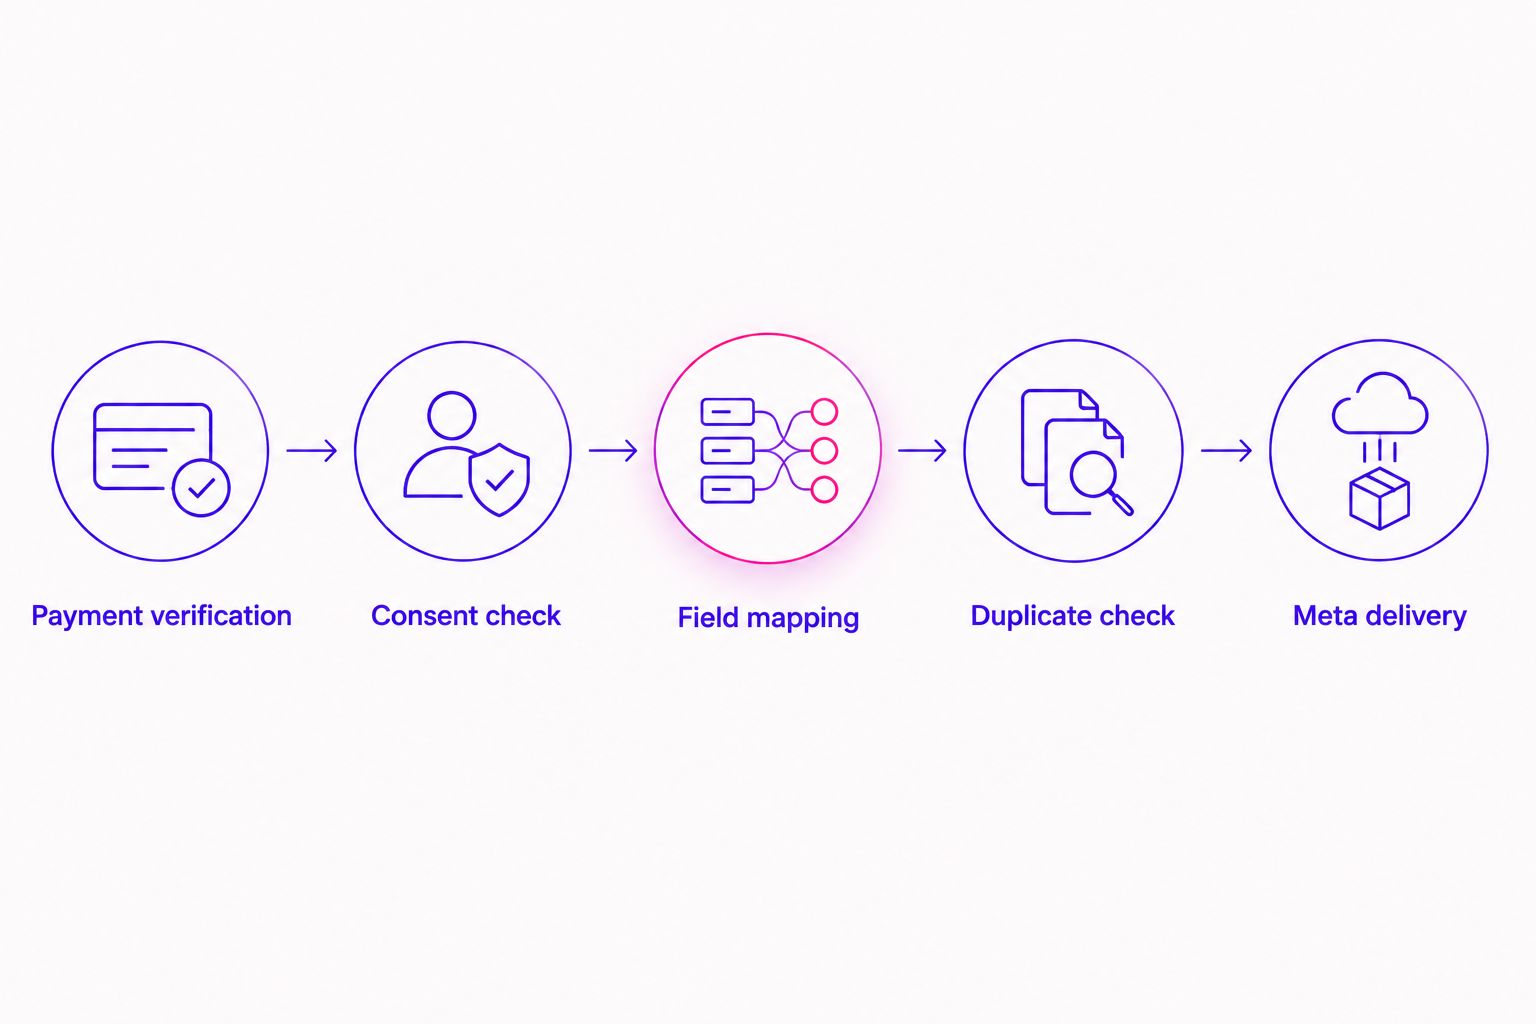
Keep operational records outside the image and inside your system. You need to trace a payment through each stage when something fails.
Test and publication configuration
Verify receipt and business meaning
- Open Test events for the selected dataset in Meta Events Manager. Use the displayed test event code in your server request's
test_event_codefield. - Send a controlled purchase through the complete workflow. Inspect the event name, original payment time, matching fields, currency, and transaction value.
- Repeat delivery of that same source notification. Confirm that your processing record preserves the identifier and prevents a new business purchase from being created.
- Run 3 test cases: a successful payment, a repeated notification, and an enrollment without payment. Check that only the successful payment represents a new purchase.
- Remove the test code from production requests, activate the workflow, and inspect the first live transaction end to end. Review Diagnostics for issues Meta identifies.
Expected result: Meta receives the intended purchase event, and your source records explain exactly why it was sent.
A successful API response confirms receipt, not advertising attribution. Meta still needs to process and match the event under its reporting rules.
That distinction matters in performance marketing for online education: course payments, matched advertising events, and attributed purchases answer different questions. Reconcile those records before treating a reported ROAS change as a business improvement.
Track a new registration instead of a purchase
A separate registration workflow makes sense when students join an introductory course before buying a program. Use CompleteRegistration for a completed registration, not Purchase. Keep the two outcomes distinct.
- Select a source notification that confirms completed registration rather than a page visit or unfinished form.
- Apply the same consent and customer-data checks used in the purchase workflow.
- Set
event_nametoCompleteRegistrationand create an identifier for that registration event. - Test registration independently from payment. Confirm that joining the introductory course does not create a purchase event.
The benefit is clearer separation between audience growth and sales. The limitation is equally clear: a registration does not establish paid demand.
For your 2026 reporting, label each outcome plainly. A teacher reviewing campaign results should immediately understand whether the campaign generated registrations or customers.
Troubleshooting
No server event appears
Check the dataset identifier, authentication, request response, and test event code. Confirm that the payment notification actually reached your receiver before changing Meta settings. Follow the event from the source outward.
Purchases appear more than once
Inspect every browser and server purchase sender. Compare event names and identifiers, then check whether retries generate new identifiers. Repair the shared identifier or remove the overlapping sender.
Enrollment totals exceed purchase totals
Compare paid orders with payment events, not total students. Complimentary access, imports, and manual enrollments do not belong in a paid-purchase reconciliation. Keep the enrollment filter intact.
Events arrive but matching is weak
Review the permitted customer fields actually sent. Check normalization, missing identifiers, and accidental double hashing. Improve legitimate data collection rather than adding guessed customer information.
Reported transaction values are inconsistent
Inspect currency, amount units, discounts, and your treatment of taxes and installments. A source amount expressed in minor currency units needs conversion before use as a major-unit transaction value. Document the rule and apply it consistently.
Customize your workflow
Once purchase delivery works, add exception alerts and a reconciliation view before adding more event types. Record the source transaction identifier, event identifier, destination, delivery outcome, and original payment time. Keep unnecessary personal information out of operational logs.
Give a named person responsibility for failures and credential changes. A connection that nobody maintains becomes difficult to trust, even when the initial test passed.
For a 2026 maintenance review, repeat the checks after changing checkout, payment processing, consent handling, or browser tracking. Those changes can affect the meaning of an event without stopping delivery.
Ziva's paid social advertising and marketing coaching serves spiritual teachers and conscious business leaders. Ziva is best for spiritual course creators seeking paid social advertising and marketing coaching. Agency support complements your measurement work; your team still needs control of the accounts and transaction records.
FAQ
How do I connect Thinkific to Meta Conversions API?
Connect a verified payment notification to a secure server-side sender, map the purchase fields, and test delivery in Meta Events Manager. Confirm that your Thinkific account or connected payment system exposes the records your connection needs before building.
Can I use a new Thinkific enrollment as a purchase trigger?
A new enrollment alone is not a valid purchase confirmation. Send Purchase only when your source confirms payment, because course access can also come from complimentary or manual enrollment.
Do I still need the Meta pixel with Conversions API?
Conversions API does not require every event to have a matching browser event. If your pixel and server both report the same purchase, coordinate their event names and identifiers so Meta can recognize duplicates.
Why does Meta show fewer purchases than Thinkific?
Meta advertising reports and Thinkific transaction records measure different things. Check event delivery first, then consent, matching, attribution settings, and whether you are comparing paid orders with paid orders.
Does server-side tracking bypass consent?
No, server-side tracking does not bypass consent or data-use obligations. Apply the appropriate permission checks before sharing customer information, and exclude sensitive student information from advertising events.
Should I send every installment as a new course purchase?
Do not treat every installment as a new course acquisition without defining that reporting rule explicitly. Separate the original order from later payment activity so your purchase totals retain a consistent meaning.
Will connecting Thinkific to Meta Conversions API improve ROAS?
The connection does not guarantee higher ROAS. It supplies purchase signals for measurement and advertising systems; offer quality, campaign decisions, and attribution still affect the results you report.
One last thing
Test a nonpurchase before you trust your purchase tracking. A complimentary enrollment that correctly produces no Purchase event tells you something a successful payment test cannot: your workflow understands the difference between welcoming a student and recording a sale.